Have you ever looked in the mirror and wished your skin felt cleaner or looked clearer? The key to great skin often starts with one important step: washing your face properly. It’s not just splashing water and rubbing soap; it’s a skill that can change your skin.
For many, washing our face is a quick task. We might use any soap we find or a cleanser our friend suggested, without considering what our skin really needs. Learning how to clean your face correctly and choosing the right cleanser for your skin type can make a big difference. Think of it like building a strong house – you need a solid foundation. For your skin, that foundation is being clean and healthy. Just like a good haircut can change your look, knowing how to care for your skin can improve your complexion.
In this guide, I’ll share everything you need to know about cleansing. You’ll learn why it’s important and get a step-by-step routine that will leave your skin feeling fresh and ready for other products. We’ll discuss different types of cleansers, common mistakes to avoid, and some advanced tips to enhance your routine. So, get comfortable, and let’s explore proper facial cleansing!
Why Proper Cleansing Matters: More Than Just “Clean” Skin
You might be thinking, “It’s just washing my face, how important can it be?” Trust me, it’s incredibly important! Our skin is constantly exposed to a cocktail of environmental stressors: pollution, dust, dirt, sweat, and even tiny bugs. Add to that the natural oils (sebum) our skin produces, dead skin cells, and any makeup or sunscreen we apply, and you’ve got a recipe for clogged pores, breakouts, and a dull complexion.
Here’s why taking cleansing seriously is a game-changer for your skin:
- Removes Impurities: This is the most obvious benefit. A good cleanse effectively removes all the unwanted junk that accumulates on your skin throughout the day and night. Think of it as hitting the reset button for your face.
- Prevents Breakouts: When pores get clogged with oil, dead skin cells, and bacteria, it creates the perfect environment for pimples, blackheads, and whiteheads. Regular, proper cleansing helps keep those pores clear, reducing the chances of breakouts.
- Maintains Skin Balance: Our skin has a natural protective barrier called the “acid mantle” and a delicate pH level. Using the wrong cleanser or washing too harshly can strip this barrier, leading to dryness, irritation, and even increased oil production (your skin trying to compensate). A gentle, pH-balanced cleanser helps maintain this vital balance.
- Improves Product Absorption: Clean skin is like a sponge ready to soak up moisture and nutrients. If your skin is covered in a layer of grime, your expensive serums, moisturizers, and treatments can’t penetrate effectively. Cleansing prepares your skin to get the most out of your other skincare products.
- Boosts Radiance: When dead skin cells and dulling impurities are removed, your skin’s natural glow can shine through. You’ll notice a brighter, healthier-looking complexion.
- Promotes Healthy Cell Turnover: By removing old, dead skin cells, cleansing encourages your skin to produce new, fresh cells, contributing to a more youthful and vibrant appearance over time.
- Prevents Premature Aging: While cleansing won’t stop aging, keeping your skin clean and healthy can help prevent issues that contribute to a prematurely aged look, such as inflammation and oxidative stress from pollution.
“A clean face is the canvas for healthy, glowing skin. Skipping this step is like trying to paint a masterpiece on a dirty board.”
Just as you might visit a reputable barbershop for a fresh haircut and a confidence boost, investing time in a proper cleansing routine is an investment in your overall appearance and well-being. It’s part of a holistic approach to self-care that makes you feel good from the inside out. For more on why visiting a barbershop is more than just a haircut, check out this article: Why Visiting a Barbershop is More Than Just a Haircut.
Understanding Your Skin Type: The First Step to Choosing Your Cleanser
Before you even think about picking up a cleanser, you need to understand your skin. Just like there’s no one-size-fits-all haircut, there’s no one-size-fits-all cleanser. Using a cleanser meant for oily skin on dry skin, for example, can make your dryness worse. Knowing your skin type is crucial for choosing products that work with your skin, not against it.
Let’s break down the common skin types:
1. Normal Skin
- Characteristics: Balanced – not too oily, not too dry. Pores are small and not very noticeable. You rarely experience breakouts or sensitivity.
- Feeling: Comfortable, smooth, and supple.
- Cleanser Needs: Gentle, pH-balanced cleansers that maintain this balance without stripping or adding too much moisture. Gel or cream cleansers often work well.
2. Oily Skin
- Characteristics: Shiny, especially in the T-zone (forehead, nose, chin). Larger, more visible pores. Prone to blackheads, whiteheads, and acne.
- Feeling: Greasy, especially by midday.
- Cleanser Needs: Gel, foaming, or clay-based cleansers that can effectively remove excess oil and clear pores without over-drying. Look for ingredients like salicylic acid or benzoyl peroxide if you’re prone to breakouts.
3. Dry Skin
- Characteristics: Feels tight, especially after washing. It may look flaky, dull, or rough. Small, almost invisible pores. Prone to redness and irritation.
- Feeling: Tight, sometimes itchy, or rough.
- Cleanser Needs: Cream, oil, or balm cleansers that are hydrating and non-foaming. Avoid harsh sulfates and alcohol. Look for ingredients like hyaluronic acid, glycerin, and ceramides.
4. Combination Skin
- Characteristics: A mix of oily and dry/normal areas. Typically, the T-zone is oily, while cheeks are dry or normal.
- Feeling: Oily in some spots, dry in others.
- Cleanser Needs: Gentle, balancing cleansers that don’t over-dry the dry areas or leave the oily areas feeling greasy. Gel or light foaming cleansers are often a good choice. You might even consider “multi-masking” with different cleansers for different areas, though one good balancing cleanser is usually sufficient.
5. Sensitive Skin
- Characteristics: Easily irritated, prone to redness, itching, burning, or breakouts from certain products. It can be dry, oily, or a combination, but the key is its reactivity.
- Feeling: Reactive, easily uncomfortable.
- Cleanser Needs: Extremely gentle, fragrance-free, soap-free, and hypoallergenic formulas. Cream or micellar water cleansers are often best. Avoid harsh exfoliants, strong acids, and dyes.
How to figure out your skin type: Wash your face with a gentle cleanser, pat it dry, and wait about an hour without applying any products. Then, observe:
- Shiny all over? Oily.
- Tight and flaky? Dry.
- Shiny T-zone, dry cheeks? Combination.
- Comfortable and balanced? Normal.
- Red, itchy, or irritated? Sensitive.
Once you know your skin type, you’re ready for the next crucial step: choosing the right cleanser!
Choosing the Right Cleanser: Your Skin’s Best Friend
Now that you know your skin type, let’s talk about the different kinds of cleansers out there and what they do best. The market is flooded with options, but understanding the basics will help you make an informed choice.
Here’s a breakdown of common cleanser types:
1. Gel Cleansers
- Texture: Clear, jelly-like consistency.
- Best for: Oily, combination, and acne-prone skin.
- Benefits: Deeply cleanse pores, remove excess oil, and feel refreshed. Many have foaming properties.
- Things to note: They can sometimes be a bit drying for very dry or sensitive skin if they contain strong foaming agents.
2. Foaming Cleansers
- Texture: Start as a liquid or cream and transform into a rich lather when mixed with water.
- Best for: Oily and combination skin.
- Benefits: Excellent for removing oil, dirt, and makeup. Leave skin feeling very clean.
- Things to note: Can be too stripping for dry or sensitive skin. Look for “gentle foaming” options.
3. Cream Cleansers
- Texture: Thick, creamy, lotion-like consistency.
- Best for: Dry, normal, and sensitive skin.
- Benefits: Hydrating and non-stripping. They cleanse without removing essential moisture, leaving skin soft and comfortable. Often don’t lather much.
- Things to note: May not feel “clean enough” for very oily skin types or those who wear heavy makeup.
4. Oil Cleansers
- Texture: Liquid oil.
- Best for: All skin types, especially dry, sensitive, and those who wear makeup.
- Benefits: “Oil dissolves oil.” Excellent for breaking down makeup (even waterproof mascara), sunscreen, and sebum without stripping the skin. They can be very gentle and nourishing.
- Things to note: Usually used as a first step in a “double cleansing” routine. Some people might feel a slight residue if not rinsed properly or followed by a second cleanse.
5. Balm Cleansers
- Texture: Solid, waxy balm that melts into an oil upon contact with skin.
- Best for: All skin types, especially dry and those who wear heavy makeup.
- Benefits: Similar to oil cleansers, they are incredibly effective at dissolving makeup and impurities while being very hydrating. Great for a luxurious feel.
- Things to note: It is also often used as a first step in double cleansing. It can be pricier.
6. Micellar Water
- Texture: Clear, watery liquid.
- Best for: All skin types, especially sensitive and dry. Great for quick cleanses or makeup removal.
- Benefits: Contains tiny “micelles” (oil molecules) that attract and lift away dirt, oil, and makeup without needing to rinse. Very gentle.
- Things to note: While it can cleanse, it’s often best used as a first step to remove makeup, or for a refresh, rather than a deep clean, especially at night. A proper wash is usually recommended after.
7. Clay Cleansers
- Texture: Creamy, often with a slight grittiness if it contains exfoliating particles.
- Best for: Oily and acne-prone skin.
- Benefits: Clays (like kaolin or bentonite) absorb excess oil, draw out impurities, and can help detoxify pores.
- Things to note: Can be drying if used too frequently on non-oily skin.
Key Ingredients to Look For (and Avoid)
When reading cleanser labels, here’s what I recommend:
Look for:
- Glycerin: A humectant that draws moisture into the skin.
- Hyaluronic Acid: Another powerful humectant for hydration.
- Ceramides: Help repair and maintain the skin’s natural barrier.
- Niacinamide (Vitamin B3): Soothes skin, reduces redness, and helps with oil regulation.
- Salicylic Acid (BHA): Great for oily and acne-prone skin as it dissolves oil and exfoliates inside pores.
- Gentle Surfactants: Look for cocamidopropyl betaine, decyl glucoside, or sodium laureth sulfate (in moderation) rather than harsh ones.
- Natural Extracts: Aloe vera, chamomile, green tea for soothing properties.
Avoid (especially if you have dry or sensitive skin):
- Harsh Sulfates (e.g., Sodium Lauryl Sulfate – SLS): Can be very stripping and irritating.
- Alcohol (especially denatured alcohol): Drying and can damage the skin barrier.
- Strong Fragrances/Dyes: Common irritants for sensitive skin.
- Parabens/Phthalates: Some people prefer to avoid these for general health reasons.
- Abrasive Exfoliants (e.g., crushed nut shells): Can create micro-tears in the skin. Opt for chemical exfoliants (AHAs/BHAs) or very fine, smooth beads.
“Your cleanser should leave your skin feeling clean and comfortable, not tight, squeaky, or irritated.”
Choosing the right cleanser is like choosing the right tool for a job. You wouldn’t use a hammer to cut wood, just as you wouldn’t use a harsh foaming cleanser on dry, sensitive skin. Take your time, read labels, and be willing to try a few samples to find your perfect match.
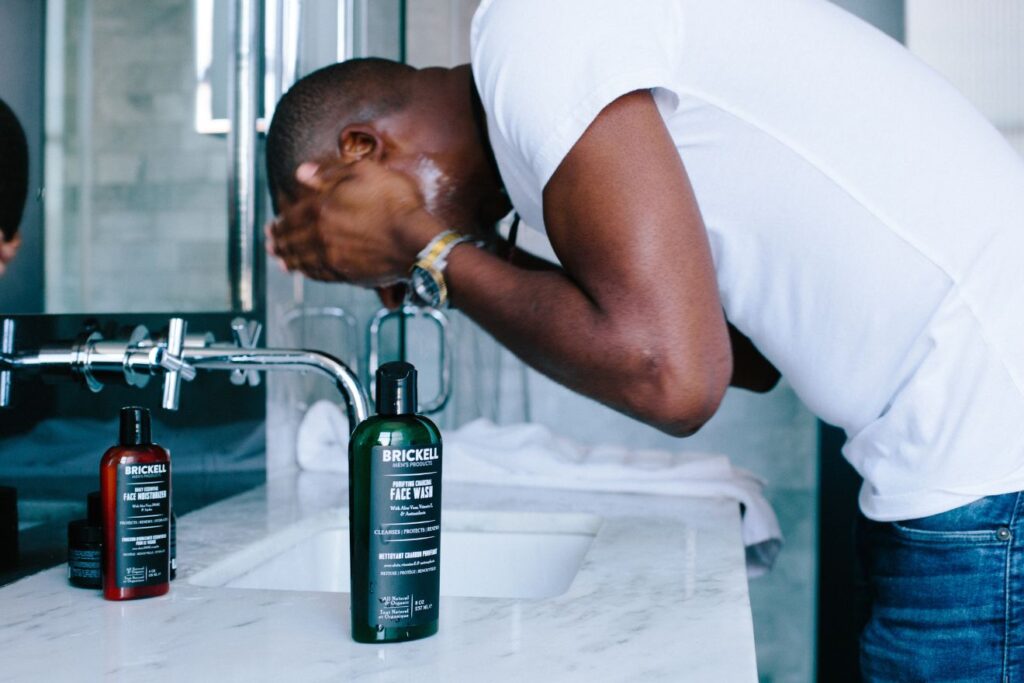
The Step-by-Step Guide: How to Properly Wash Your Face
Now for the practical part! This is where we put all that knowledge into action. Following these steps consistently will make a huge difference in your skin’s health and appearance.
Step 1: Prepare Your Hands and Hair
Before you even touch your face, make sure your hands are clean. Wash them with soap and water for at least 20 seconds. You don’t want to transfer bacteria from your hands to your face! If you have long hair, tie it back with a headband or hair tie so it’s out of your face. This prevents the product from getting in your hair and keeps your hairline clean.
Step 2: Remove Makeup (Optional, but Recommended for Evening)
If you’re wearing makeup, especially heavy foundation, eye makeup, or waterproof mascara, a “first cleanse” is essential. This is where an oil cleanser, balm cleanser, or micellar water shines.
- For oil/balm cleansers: Apply a small amount (a pump or a pea-sized amount) directly to your dry face. Gently massage it over your entire face, including your eyes, for about 30-60 seconds. You’ll feel the makeup dissolving. Then, add a little water to your hands to emulsify the oil/balm (it will turn milky), continue massaging, and then rinse thoroughly with lukewarm water.
- For micellar water: Soak a cotton pad and gently swipe it across your face, eyes, and lips. Repeat with fresh pads until no makeup comes off. No rinsing needed with micellar water, but I still recommend a second cleanse afterward.
This step is crucial because your main cleanser can’t effectively clean your skin if it’s struggling to break through layers of makeup and sunscreen.
Step 3: Wet Your Face with Lukewarm Water
Splash your face with lukewarm water. Not hot, not cold. Hot water can strip your skin of its natural oils and cause irritation, while cold water won’t effectively loosen dirt and oil. Lukewarm water is just right – it helps to open up pores slightly and allows the cleanser to work its magic.
Step 4: Dispense and Activate Your Cleanser
- For most cleansers (gel, foam, cream): Squeeze a dime-sized amount (or as directed on the bottle) into your clean palm.
- For foaming cleansers: Add a few drops of water to the cleanser in your palm and rub your hands together to create a light foam before applying to your face.
- For cream/non-foaming cleansers: Just spread it evenly over your face.
Step 5: Gently Massage Your Face
Apply the cleanser to your damp face using your fingertips. Use gentle, circular motions to massage the cleanser all over your face and neck.
- Duration: Aim for 30-60 seconds. This gives the cleanser enough time to break down dirt, oil, and impurities.
- Technique: Start from your forehead, move down to your nose, cheeks, chin, and don’t forget your jawline and neck! Pay extra attention to areas where you tend to get oily or congested (like the T-zone).
- Pressure: Use light pressure. There’s no need to scrub vigorously; your fingers are enough. Harsh scrubbing can irritate your skin and damage its protective barrier.
“Think of cleansing as a gentle massage, not a vigorous scrub. Your skin is delicate!”
Step 6: Rinse Thoroughly
Rinse your face thoroughly with lukewarm water. Make sure to get all the cleanser off, especially around your hairline, jawline, and nose, where product can easily get stuck. Any residue left behind can clog pores or irritate your skin. You can use your hands to splash water, or if you prefer, a clean, soft washcloth dedicated solely to your face (and changed daily).
Step 7: Pat Dry
Gently pat your face dry with a clean, soft towel. Do not rub your face with the towel, as this can irritate the skin and pull at it, which isn’t good for elasticity over time. A dedicated facial towel is a great idea to ensure cleanliness. Leave your skin slightly damp – this helps with the absorption of the next products in your routine.
Step 8: Follow with Your Skincare Routine
Immediately after patting dry (while your skin is still slightly damp), apply your toner (if you use one), serums, treatments, and moisturizer. Your clean, slightly damp skin is now perfectly primed to absorb these beneficial ingredients.
When to Cleanse: Timing is Everything
Consistency is key when it comes to cleansing. I recommend cleansing your face twice a day: once in the morning and once at night.
Morning Cleanse
- Why: Even while you sleep, your skin is busy. It produces oil, sheds dead skin cells, and you might have sweat or residue from your nighttime skincare products. A morning cleanse removes these, leaving your skin fresh for the day and ready for your morning skincare routine (serum, moisturizer, SPF).
- How: A quick, gentle cleanse is usually sufficient. A cream, gel, or micellar water can work well.
Night Cleanse
- Why: This is arguably the most important cleanse. Throughout the day, your skin collects makeup, sunscreen, pollution, dirt, sweat, and excess oil. Failing to remove these before bed can lead to clogged pores, breakouts, and dull skin. It also prevents your nighttime treatments from working effectively.
- How: This is where a double cleanse (if you wear makeup or heavy SPF) is highly recommended. Follow the full step-by-step guide above.
After Workouts or Excessive Sweating
If you’ve had a particularly sweaty workout or spent time outdoors in hot weather, it’s a good idea to cleanse your face as soon as possible afterward. Sweat, combined with dirt and bacteria, can quickly clog pores. A quick, gentle cleanse will prevent breakouts. If you can’t do a full wash, keep some micellar water and cotton pads handy for a quick refresh.
Common Cleansing Mistakes to Avoid
Even with the best intentions, it’s easy to fall into bad cleansing habits. Here are some common mistakes I see people make, and how to avoid them:
- Using Water That’s Too Hot or Too Cold: As I mentioned, extreme temperatures can shock and irritate your skin. Stick to lukewarm water.
- Over-Washing: Cleansing more than twice a day (unless after a very sweaty activity) can strip your skin’s natural oils, leading to dryness, irritation, and sometimes even increased oil production as your skin tries to compensate.
- Harsh Scrubbing: Your skin is not a kitchen floor! Aggressive scrubbing or using abrasive physical exfoliants (like those with large, jagged particles) can create micro-tears in your skin, damage your skin barrier, and lead to inflammation or sensitivity. Be gentle!
- Using the Wrong Cleanser for Your Skin Type: This is a big one. A cleanser that’s too harsh for dry skin will make it drier, and one that’s too rich for oily skin will make it oilier. Refer back to the skin type section!
- Not Rinsing Thoroughly: Leftover cleanser can clog pores, irritate your skin, and prevent subsequent products from absorbing. Make sure every last bit is rinsed off.
- Using a Dirty Washcloth or Towel: This defeats the purpose of cleansing! Always use a clean towel dedicated to your face, and change it regularly (daily is best).
- Forgetting Your Neck and Jawline: These areas are just as exposed to dirt and grime as your face and need cleansing too.
- Using Bar Soap: Most traditional bar soaps are too alkaline (high pH) for your face. They can strip your skin’s natural barrier, leaving it feeling tight, dry, and irritated. Stick to cleansers specifically formulated for the face.
- Not Removing Makeup First: Trying to cleanse your skin and remove makeup in one go, especially heavy makeup, often means neither job is done effectively. A double cleanse is the way to go at night.
- Waiting Too Long to Apply Skincare After Cleansing: Your skin is most receptive to absorbing products when it’s slightly damp. Applying serums and moisturizers within a minute or two after cleansing helps lock in moisture and allows products to penetrate better.
Avoiding these common pitfalls will significantly improve your cleansing routine and, by extension, your skin health.
Advanced Cleansing Tips: Taking Your Routine to the Next Level
Once you’ve mastered the basics, you might be interested in some advanced techniques to further boost your skin health.
Double Cleansing: The Ultimate Cleanse
I briefly mentioned this, but let’s dive deeper. Double cleansing involves using two different types of cleansers, one after the other.
- First Cleanse (Oil-based): Use an oil cleanser, balm cleanser, or micellar water to break down and remove oil-based impurities like makeup, sunscreen, and excess sebum.
- Second Cleanse (Water-based): Follow up with a traditional gel, foam, or cream cleanser to wash away any remaining residue and cleanse the skin itself.
- Who it’s for: Anyone who wears makeup, heavy sunscreen, or lives in a polluted environment. Great for all skin types, including oily and acne-prone, as oil cleansers are surprisingly effective at breaking down sebum without stripping.
- Benefits: It ensures a truly deep clean, prevents clogged pores, and allows your skin to breathe.
Cleansing Devices: Are They Worth It?
There are many cleansing brushes and silicone devices on the market.
- Benefits: They can provide a deeper clean and gentle exfoliation, helping to remove more dead skin cells and impurities than hands alone. Some people find that they improve circulation and product absorption.
- Things to note:
- Gentle is key: Opt for soft silicone brushes or very gentle oscillating brushes. Avoid harsh bristle brushes.
- Don’t overdo it: Use them only a few times a week, not daily, especially if you have sensitive skin.
- Hygiene: Keep your device clean! Wash it regularly with soap and water, and replace brush heads as recommended.
- Not for everyone: If you have very sensitive, inflamed, or active acne, these devices might be too irritating. Always listen to your skin.
The Power of pH-Balanced Cleansers
Your skin’s natural pH is slightly acidic (around 4.7 to 5.7). Many traditional soaps are alkaline (high pH), which can disrupt your skin’s acid mantle, making it vulnerable to bacteria and irritation. Choosing a cleanser that is “pH-balanced” or “low pH” helps maintain your skin’s natural protective barrier, keeping it healthy and resilient. This is particularly important if you deal with issues like eczema or general skin sensitivity.
Exfoliating Cleansers: Use with Caution!
Some cleansers contain exfoliating ingredients like salicylic acid (BHA) or glycolic acid (AHA), or tiny beads.
- Benefits: Can be great for targeting specific concerns like acne (BHA) or dullness (AHA) and providing a daily gentle exfoliation.
- Things to note: Be mindful of how often you use them. If you’re using other exfoliating products (toners, serums), you might be over-exfoliating, which can lead to irritation and a damaged skin barrier. Listen to your skin and reduce frequency if you notice redness, dryness, or sensitivity. For men, this can be especially helpful to prevent ingrown hairs.
Beyond Cleansing: What Comes Next? Your Skincare Routine
Cleansing is just the first step in a complete skincare routine, but it’s arguably the most important foundation. Once your skin is clean, it’s ready to receive the benefits of other products.
A basic skincare routine typically follows this order:
- Cleanse: (As we just discussed!)
- Tone (Optional): A toner can help balance your skin’s pH, remove any last traces of impurities, and prepare your skin for serums.
- Treat (Serums/Targeted Treatments): These are concentrated formulas designed to address specific concerns like acne, anti-aging, hyperpigmentation, or hydration.
- Moisturize: Essential for all skin types! Moisturizers hydrate your skin and help lock in all the goodness from previous steps, supporting your skin’s barrier.
- Protect (SPF – Morning Only): Non-negotiable for daytime! Sunscreen protects your skin from harmful UV rays, which are a major cause of premature aging and skin cancer.
Just as a great barber can help you unlock the power of the perfect cut, a consistent skincare routine can help you unlock your best skin. While we’re talking about overall grooming and health, it’s worth noting that taking care of your skin is just as important as taking care of your hair. For example, many men focus on hair care, like preventing hair loss, but facial skin is equally important. If you’re interested in hair health, you might find this article useful: Say Goodbye to Hair Loss: How to Prevent Balding Effectively.
Taking care of your skin is a form of self-care. It’s an investment in your appearance, confidence, and long-term skin health. Just as you might consider different hair straightening treatments for your hair, you should consider the right products for your skin type to ensure it stays healthy. For more on hair treatments, check out: Permanent vs. Temporary: Choosing the Right Hair Straightening Treatment for You.
Remember, good skin takes time and consistency. Don’t expect overnight miracles. Stick with your routine for at least 4-6 weeks to see noticeable results.
FAQs
Q1: How often should I wash my face?
A: Generally, twice a day – once in the morning and once at night – is ideal. You might add a third cleanse after a very sweaty workout or if you’ve been in a very dusty/polluted environment. Over-washing can strip your skin.
Q2: Can I just use water to wash my face?
A: While water can rinse away some surface dirt, it won’t effectively remove oil, sunscreen, makeup, or deeply embedded impurities. A good cleanser is necessary to properly break down and lift away these substances, ensuring a truly clean face.
Q3: My skin feels “squeaky clean” after washing. Is that good?
A: No! “Squeaky clean” usually means your skin’s natural oils and protective barrier have been stripped. Your skin should feel clean, but also soft and comfortable, not tight or dry. If it feels squeaky, your cleanser might be too harsh for your skin type.
Q4: Should I use a washcloth or just my hands?
A: Your hands are usually sufficient. If you use a washcloth, make sure it’s very soft and clean, and use gentle, circular motions. Avoid rubbing. Using a fresh, clean washcloth daily is crucial to prevent bacteria buildup.
Q5: What’s the difference between a face wash and a cleanser?
A: These terms are often used interchangeably. “Cleanser” is a broader term that includes various forms (gels, creams, oils, balms, micellar water). “Face wash” often refers specifically to foaming or gel cleansers that you rinse off with water. Ultimately, they serve the same purpose: to clean your face.
Q6: Can cleansing help with dandruff or other skin issues?
A: While cleansing focuses on facial skin, understanding skin conditions in general is important. If you’re experiencing issues like dandruff on your scalp, it highlights the importance of proper hygiene and targeted treatments for specific skin areas. Just as you’d address scalp issues, facial skin needs its own care. For more on dandruff, check out: Dandruff: Symptoms, Causes, and Treatments.
Q7: How long does it take to see results from proper cleansing?
A: You’ll likely notice an immediate improvement in how your skin feels (cleaner, fresher). For visible changes like fewer breakouts, reduced oiliness, or improved radiance, give it at least 2-4 weeks of consistent, proper cleansing. Skin cell turnover takes time!
Conclusion
Properly washing your face and choosing the right cleanser might seem like small details, but they are the bedrock of a healthy, glowing complexion. By understanding your skin type, selecting the appropriate products, and mastering the gentle art of cleansing, you’re not just cleaning your face; you’re investing in your skin’s long-term health and vitality.
Remember, consistency is your best friend. Make cleansing a non-negotiable part of your daily routine, morning and night. Treat your skin with the care and respect it deserves, and it will thank you by looking its best. Just as every man needs a great barber to unlock the power of the perfect cut and feel confident, every person needs a great cleansing routine to unlock their best skin. You can read more about the importance of a great barber here: Why Every Man Needs a Great Barber: Unlocking the Power of the Perfect Cut.
So, go forth, cleanse with confidence, and enjoy the journey to healthier, happier skin! If you have any questions or tips of your own, feel free to share them below. Your skin will thank you for it!