Have you ever looked in the mirror and noticed tiny black dots on your nose? You’re not alone! These are often blackheads, and they’re a common skin concern for many of us. While they might seem stubborn, there’s a popular and satisfying solution: nose strips! They promise to pull out those pesky impurities, leaving your skin feeling cleaner and smoother. But simply sticking one on isn’t always enough to get the best results. To truly maximize their pore-clearing power, knowing how to apply a nose strip correctly is key.
As someone who cares deeply about skin health and grooming, I’ve learned that small details make a big difference. Just like getting a precise haircut from a great barber, applying a nose strip properly can transform your skin. In this comprehensive guide, I’ll walk you through every step, share common mistakes to avoid, and reveal tips for getting that satisfying “peel” and clearer skin. Get ready to say goodbye to clogged pores!
Key Takeaways
- Preparation is Paramount: Always start with a clean face and open pores (using warm water or steam) to ensure the strip sticks well and works effectively.
- Apply to Damp Skin: The nose strip needs moisture to activate its adhesive, but your nose should be damp, not soaking wet, for optimal grip.
- Smooth It Down Thoroughly: Press the strip firmly and evenly onto your nose, removing any air bubbles, to ensure maximum contact with your skin and pores.
- Patience is a Virtue: Allow the strip to dry completely, usually 10-15 minutes, until it feels stiff, before slowly peeling it off from the edges towards the center.
- Follow Up with Aftercare: Close your pores with a splash of cold water or toner and moisturize to soothe your skin after use.
Why Nose Strips? Understanding Their Magic
Before we dive into the “how-to,” let’s quickly understand what nose strips are and why they work. Nose strips are adhesive-backed pieces of fabric, often infused with ingredients like charcoal or witch hazel. When activated by water, the adhesive binds to the oils, dirt, dead skin cells, and blackheads nestled within your pores. As the strip dries and you peel it away, it physically extracts these impurities, leaving your pores looking clearer.
It’s a bit like a mini-vacuum for your nose! While they don’t permanently shrink your pores (that’s a myth!), they certainly help in keeping them clean, which can make them appear smaller and less noticeable. For many, the visual evidence on the strip after removal is incredibly satisfying and motivates continued use.
The Benefits of Using Nose Strips Regularly
Beyond the instant gratification of seeing what comes off, there are several good reasons to include nose strips in your skincare routine:
- Deep Pore Cleansing: They get deep into the pores, pulling out grime that regular washing might miss.
- Blackhead Removal: This is their primary superpower! They are excellent at lifting out blackheads, which are essentially clogged pores that have oxidized and turned dark.
- Improved Skin Texture: By removing dead skin cells and impurities, your nose can feel smoother and look more refined.
- Quick and Convenient: Nose strips are easy to use at home and take only a few minutes from start to finish.
- Boosts Confidence: Clearer skin often leads to a boost in self-confidence, helping you feel your best. Just as a great haircut from a professional barber can make you feel polished, investing in your skin health contributes to your overall well-being. If you’re looking for ways to enhance your appearance and confidence, understanding why every man needs a great barber is a fantastic starting point for overall grooming.
Before You Begin: Essential Preparations
Think of applying a nose strip like preparing for a detailed grooming session. You wouldn’t just jump into a haircut without the right tools and a clean canvas, right? The same goes for nose strips. Proper preparation is half the battle won!
Gather Your Supplies
Before you even touch the strip, make sure you have everything you need within reach:
- Your chosen nose strip: Check the expiration date!
- Gentle facial cleanser: To get rid of surface dirt and oil.
- Warm water: For cleansing and opening pores.
- A clean towel: For patting your skin dry.
- Optional but recommended: A small bowl for steaming, or a warm washcloth.
- Toner or astringent (alcohol-free preferred): For aftercare.
- Moisturizer: Essential for rehydrating your skin.
Cleanse Your Face Thoroughly
This step is non-negotiable! You need a clean surface for the strip to adhere properly and effectively pull out impurities.
- Wash your face: Use a mild, gentle cleanser and warm water. Massage it into your skin in circular motions, paying extra attention to your nose area.
- Rinse well: Make sure all traces of cleanser are gone.
- Pat dry: Gently pat your entire face dry with a clean towel. Your skin should be clean but still slightly damp, especially your nose, for the next step.
Open Your Pores (Steam is Your Friend!)
This is arguably the most crucial preparatory step for maximizing the effectiveness of your nose strip. When your pores are open, the strip can better reach and extract the gunk inside.
- Warm water splash: The simplest way is to splash your face with warm water for a minute or two after cleansing.
- Warm washcloth: Dampen a clean washcloth with warm water, wring it out, and lay it over your nose for 2-3 minutes. The warmth will help loosen up the impurities.
- Facial steaming: For the best results, consider a mini-steam session. Fill a bowl with hot (but not boiling!) water, lean your face over it (with a towel draped over your head to trap the steam), and stay there for 5-10 minutes. Be careful not to get too close to avoid burns. This method is incredibly effective at softening the contents of your pores.
“For the best results, always open your pores before applying a nose strip. Steam or a warm washcloth can make a world of difference in how much gunk comes out!”
After steaming, your nose should be ready. Remember, the skin on your nose needs to be damp, not dripping wet, for the strip to stick properly. If it’s too wet, the adhesive won’t grip effectively. If it’s too dry, it won’t activate. A quick blot with a towel if it’s overly wet is perfect.
Step-by-Step: How to Apply a Nose Strip Correctly
Now that your skin is perfectly prepped, let’s get down to the actual application. Follow these steps carefully for the best results:
Step 1: Wet Your Nose (But Not Too Much!)
This step is critical. Most nose strips are activated by water.
- Re-wet if needed: If your nose has dried out after cleansing and steaming, lightly re-wet it. You can splash a little warm water on your nose or use a damp cotton pad.
- Aim for dampness: Your nose should feel moist to the touch, but there shouldn’t be any standing water or drips. This dampness is what activates the adhesive on the strip.
Step 2: Peel and Position
Carefully open the nose strip packet and peel the strip from its plastic liner.
- Identify the correct side: Most strips have a smooth side and a textured, adhesive side. You want the adhesive side to go against your skin.
- Align the strip: Place the strip shiny-side down onto the bridge of your nose first. Make sure the cut-outs for your nostrils are aligned correctly.
Step 3: Smooth It Down
This is where you ensure maximum contact between the strip and your skin.
- Press firmly: Starting from the bridge of your nose, press the strip down firmly, working your way outwards towards the sides and tip of your nose.
- Eliminate air bubbles: Use your fingertips to smooth out any wrinkles or air bubbles. Ensure every part of the strip is in direct contact with your skin. The tighter the fit, the more effective it will be at gripping those impurities.
- Work quickly: Once the strip is wet, its adhesive starts working, so you want to get it perfectly positioned and smoothed down within about 30 seconds.
Step 4: Wait for It… The Drying Time
Patience is key here! This is when the magic happens.
- Relax and wait: Leave the nose strip on for the time specified in the instructions, usually 10 to 15 minutes.
- Check for stiffness: The strip should feel stiff and dry to the touch, almost like papier-mâché. If it still feels flexible or damp, it’s not ready. Leaving it on for the full recommended time ensures the adhesive has completely dried and bonded with the impurities. Don’t go over the recommended time, though, as it can make removal more difficult or cause irritation.
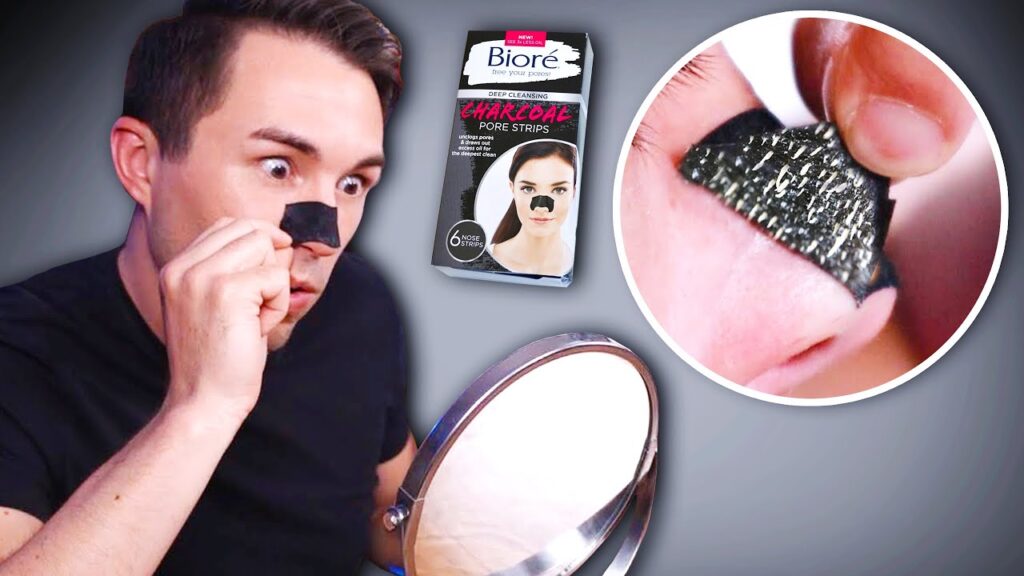
Step 5: The Grand Reveal: Peeling It Off
This is the moment of truth!
- Start from the edge: Once the strip is completely dry and stiff, begin peeling it off slowly and gently from one edge (either from the side or the bottom, whatever feels most comfortable).
- Peel towards the center: Work your way towards the center of your nose, pulling the strip firmly but steadily. Avoid ripping it off quickly, as this can irritate your skin and might not pull out as many impurities.
- Observe the results: Take a look at the strip! You should see tiny dots of extracted gunk – those are your blackheads and impurities. It’s incredibly satisfying!
Common Mistakes to Avoid
Even with a step-by-step guide, it’s easy to fall into common pitfalls. Being aware of these will help you get the best results and keep your skin happy.
Applying to Dry Skin
Mistake: Putting the strip on a completely dry nose.
Why it’s wrong: Most nose strips are activated by water. If your skin is dry, the adhesive won’t stick properly, and the strip will be ineffective.
Solution: Always ensure your nose is damp but not soaking wet.
Using on Irritated Skin
Mistake: Applying a nose strip to skin that is sunburned, broken, very sensitive, or has active acne breakouts.
Why it’s wrong: Nose strips are designed to adhere strongly. Using them on compromised skin can cause further irritation, redness, or even skin tearing.
Solution: Wait until your skin has fully healed or calmed down before using a strip. If you have very sensitive skin, do a patch test first.
Leaving It on Too Long (or Not Long Enough)
Mistake: Removing the strip before it’s fully dry, or leaving it on for an excessive amount of time.
Why it’s wrong:
- Too short: If it’s not fully dry, the adhesive won’t have completely bonded with the impurities, and you won’t get good results.
- Too long: Leaving it on for too long can make it harder to remove, potentially causing more irritation or even damaging the skin, especially if it’s very dry or sensitive.
Solution: Stick to the manufacturer’s recommended time frame, usually 10-15 minutes, until the strip feels stiff.
Peeling Too Fast
Mistake: Ripping the strip off quickly, like a bandage.
Why it’s wrong: This can be harsh on your skin, potentially causing redness, irritation, or even small broken capillaries. It also might not extract as many impurities as a slow, steady peel.
Solution: Always peel slowly and gently from the edges towards the center.
Not Following Instructions
Mistake: Ignoring the specific instructions on the nose strip packaging.
Why it’s wrong: Different brands or types of nose strips might have slightly different activation methods or recommended times.
Solution: Always read the specific instructions provided with your nose strip before use.
Aftercare: What to Do Next
Once you’ve peeled off the strip and admired your work, your skincare routine isn’t quite finished! Proper aftercare is crucial to soothe your skin and prevent future breakouts.
- Rinse your nose: Gently splash your nose with cool water to remove any adhesive residue or leftover impurities. Cold water also helps to close your pores.
- Apply toner: Use an alcohol-free toner or astringent on a cotton pad and gently swipe it over your nose. This helps to further close and tighten pores and balance your skin’s pH.
- Moisturize: Finish with a light, non-comedogenic moisturizer. This will hydrate your skin and prevent it from becoming dry or irritated.
- Avoid harsh products: For the rest of the day, try to avoid using harsh exfoliants, strong retinoids, or other potentially irritating skincare products on your nose. Give your skin a chance to recover.
How Often Should You Use Nose Strips?
This is a common question, and the answer depends on your skin type and needs.
- General recommendation: Most people find that using nose strips once every 1-2 weeks is sufficient.
- Oily skin: If you have very oily skin or are prone to a lot of blackheads, you might use them slightly more often, but never more than twice a week.
- Sensitive or dry skin: If your skin is sensitive or tends to be dry, you might opt for once every 3-4 weeks, or even less frequently.
Overuse can strip your skin of its natural oils, leading to dryness, irritation, or even increased oil production as your skin tries to compensate. Listen to your skin! If it feels sensitive, red, or irritated, give it a break.
Are Nose Strips for Everyone?
While nose strips are generally safe and effective for most skin types, they aren’t for everyone.
Avoid if you have:
- Very sensitive skin: They can be too harsh.
- Rosacea: The pulling action can worsen redness.
- Eczema or psoriasis: On or around the nose area.
- Sunburn or broken skin: Wait until your skin is healed.
- Active acne cysts or pustules: These require different treatments.
- Allergies: Check the ingredients list for anything you might be allergic to.
Consult a dermatologist: If you have persistent skin issues or are unsure if nose strips are right for you, it’s always best to consult a dermatologist. They can offer personalized advice and suggest alternative treatments if needed.
Beyond Nose Strips: Other Pore-Cleansing Tips
Nose strips are a great tool, but they’re just one part of a holistic approach to clear skin. To maintain healthy, happy pores, consider these additional tips:
- Daily Cleansing: Wash your face twice a day with a gentle cleanser to remove surface dirt, oil, and makeup.
- Exfoliation: Incorporate a gentle chemical exfoliant (like a BHA, such as salicylic acid) a few times a week. BHAs are oil-soluble and can penetrate pores to dissolve sebum and dead skin cells from within.
- Non-Comedogenic Products: Choose skincare and makeup products labeled “non-comedogenic,” meaning they are formulated not to clog pores.
- Moisturize: Even oily skin needs moisture! Hydrated skin is healthy skin.
- Healthy Diet & Hydration: What you put into your body often shows on your skin. A balanced diet and plenty of water can work wonders.
- Professional Treatments: For stubborn blackheads or overall skin health, consider professional facial treatments. Just as you might visit a salon for a rejuvenating experience like hair straightening or to address concerns like dandruff symptoms, a professional esthetician can provide deep cleaning, extractions, and personalized advice. Learn more about the benefits of visiting a men’s salon for comprehensive grooming.
- Consistency is Key: Like any good habit, consistency in your skincare routine yields the best results.
Conclusion
Applying a nose strip correctly is more than just sticking it on; it’s a small but significant act of self-care that, when done right, can lead to satisfyingly clearer skin. By taking the time to properly prepare your skin, carefully apply the strip, and follow up with good aftercare, you’re not just removing blackheads – you’re investing in the health and appearance of your skin.
Remember, clear skin is a journey, not a destination. Incorporate nose strips as part of your broader grooming routine, alongside regular cleansing, moisturizing, and perhaps even professional treatments. Your nose (and your confidence!) will thank you for it. Here’s to clearer pores and a happier you!
And if you’re ever in the mood to unwind after your skincare session, The Barber’s Cafe is a great spot to relax, sip your favorite coffee, and enjoy a moment of calm. You’ve earned it.