Have you ever looked in the mirror and wished for clearer, smoother skin? We all have those days when our pores feel clogged, and our skin looks a little dull. Black masks have become a popular secret weapon for many people looking to tackle these common skin concerns. They promise to pull out impurities, reduce blackheads, and leave your skin feeling fresh and revitalized. But if you’re new to the world of black masks, you might be wondering: “How exactly do I use this mysterious black goo?”
Don’t worry, you’re in the right place! As someone who’s explored countless skincare routines, I’m here to share everything I’ve learned about getting the most out of a black mask. Applying a black mask isn’t just about spreading it on your face; there’s a proper technique that ensures you get the best results without irritating your skin. In this comprehensive guide, I’ll walk you through each step, from preparing your skin to the satisfying peel-off, so you can achieve that glowing, fresh-faced look you’re aiming for. Let’s dive in and unlock the secrets to a flawless complexion!
Key Takeaways
- Prep is Key: Always cleanse your face thoroughly and consider steaming to open pores before applying the mask for better results.
- Apply Evenly & Avoid Sensitive Areas: Spread a thin, even layer, making sure to avoid eyebrows, hairline, and delicate skin around the eyes and lips.
- Patience for Drying: Allow the mask to dry completely, usually 15-20 minutes, before attempting to peel it off. Rushing this step can lead to a messy removal.
- Peel Gently: Start from the bottom edges and slowly peel upwards. If it’s too painful, use warm water to loosen it.
- Finish with Care: After removal, rinse any residue, tone your skin, and always follow up with a good moisturizer to soothe and hydrate.
What is a Black Mask, Anyway?
Before we get into the “how-to,” let’s quickly understand what a black mask is. Most black masks are peel-off masks that get their dark color from ingredients like activated charcoal or black clay. These ingredients are champions at absorbing oil, dirt, and other impurities from your pores. Think of them like tiny magnets pulling out all the gunk that can lead to blackheads and breakouts. They often contain other beneficial ingredients like vitamins, minerals, and plant extracts to nourish your skin while they cleanse.
Why Choose a Black Mask for Your Face?
Black masks have become incredibly popular for good reason. Here are some of the main benefits I’ve experienced and heard about:
- Deep Cleansing: They dive deep into your pores, helping to remove stubborn dirt, oil, and pollution that regular cleansers might miss.
- Blackhead Reduction: This is one of their most famous benefits! As the mask dries, it adheres to blackheads, pulling them out when you peel it off.
- Oil Control: If you have oily or combination skin, black masks can help absorb excess oil, leaving your skin feeling less greasy and more matte.
- Pore Minimizing Appearance: By clearing out clogged pores, they can make your pores look smaller and less noticeable.
- Smoother Skin Texture: Removing dead skin cells and impurities can leave your skin feeling incredibly soft and smooth.
“A black mask isn’t just about looking good; it’s about giving your skin a deep clean that can truly make a difference in its health and appearance.”
Before You Start: Gathering Your Tools
Preparation is key to a successful black mask application. Before you even open that tube or jar, make sure you have everything you need within reach. This will make the process much smoother and more enjoyable.
Here’s my checklist:
- Your Chosen Black Mask: Of course! Make sure it’s a reputable brand.
- Gentle Facial Cleanser: To wash your face before applying the mask.
- Warm Water and a Clean Towel: For rinsing and drying.
- Steaming Device or Bowl of Hot Water (Optional but Recommended): To open up your pores.
- Applicator Brush or Clean Fingers: A brush can help you apply the mask more evenly, but clean fingers work too!
- Hair Tie or Headband: To keep your hair out of the way.
- Toner: To balance your skin’s pH after the mask.
- Moisturizer: To hydrate your skin after the treatment.
The Preparation Phase: Getting Your Skin Ready
This is arguably the most important part of applying any face mask, especially a black mask. A well-prepared canvas leads to better results!
Step 1: Cleanse Your Face Thoroughly
First things first, you need a clean slate. I always start by washing my face with a gentle cleanser. This removes any makeup, dirt, and surface oils, allowing the black mask to work directly on your pores.
- Wet your face with lukewarm water.
- Apply a small amount of cleanser and gently massage it onto your skin in circular motions.
- Rinse thoroughly with lukewarm water until all cleanser is removed.
- Pat your face dry with a clean, soft towel.
Step 2: Steam Your Face (Optional but Recommended)
Steaming your face is a game-changer when it comes to black masks. The warm steam helps to open up your pores, making it easier for the mask to pull out impurities and blackheads. You don’t need a fancy steamer; a simple bowl of hot water works wonders.
How to Steam Your Face at Home:
- Boil a pot of water and pour it into a heatproof bowl.
- (Optional) Add a few drops of essential oil like tea tree or lavender for extra benefits, but be careful if you have sensitive skin.
- Carefully position your face about 8-12 inches above the bowl, making sure the steam isn’t too hot.
- Drape a clean towel over your head and the bowl to create a tent, trapping the steam.
- Steam for 5-10 minutes. Relax and enjoy the warmth!
- Once done, gently pat your face dry.
If steaming isn’t an option, a warm, damp washcloth pressed onto your face for a few minutes can also help.
Step 3: Test a Small Area First (Patch Test)
This step is super important, especially if it’s your first time using a particular black mask. Black masks can be quite strong, and some people might have a reaction.
- Apply a tiny amount of the mask to a small, hidden area of your skin, like behind your ear or on your jawline.
- Wait for the recommended drying time, then peel it off.
- Check for any redness, itching, or irritation after 24 hours. If there’s no reaction, you’re good to go!
Step-by-Step Application Guide: Your Path to Clear Skin
Now that your skin is prepped and ready, it’s time for the main event! Follow these steps carefully for the best results.
Step 4: Apply the Black Mask Evenly
This is where technique matters. You want an even layer, but not too thick or too thin.
Hair Protection: First, pull back your hair with a headband or hair tie to make sure no mask gets stuck in it. Trust me, peeling a black mask out of your hair is not fun!
Start Application: Squeeze a small amount of mask onto your fingers or an applicator brush.
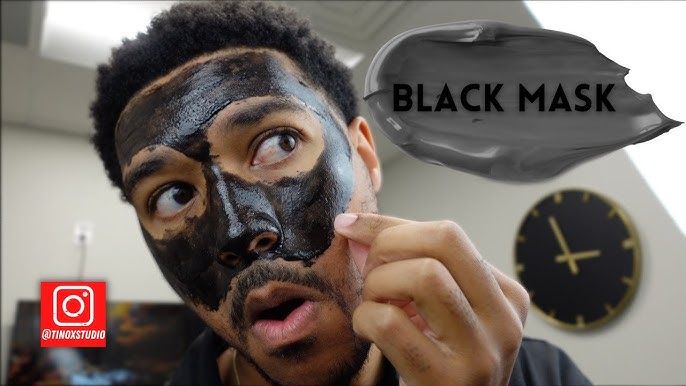
Spread evenly: Begin applying the mask to your face, avoiding sensitive areas. I usually start with my T-zone (forehead, nose, chin), where I have the most blackheads and oil.
Avoid Sensitive Areas: This is crucial!
- Eyes: Keep the mask well away from your eyes and the delicate skin around them.
- Eyebrows: Do NOT apply it to your eyebrows. It will pull out hairs!
- Hairline: Stay clear of your hairline.
- Lips: Avoid your lips.
Thickness: Aim for a medium, even layer. If it’s too thin, it won’t peel off properly. If it’s too thick, it will take forever to dry and might not work as effectively. You should be able to see your skin slightly through it, but it should feel substantial.
Step 5: Let It Dry Completely
Patience, my friend! This step is often where people go wrong. If you try to peel the mask off before it’s completely dry, it will be a messy, sticky nightmare.
- Relax: Sit back, relax, and let the mask do its work. Avoid talking or making too many facial expressions, as this can crack the mask.
- Drying Time: Most black masks take 15-20 minutes to dry. However, this can vary depending on the product and how thick you applied it.
- Check for Dryness: The mask should feel tight on your skin and be completely dry to the touch. It shouldn’t feel sticky or wet anywhere. You’ll know it’s ready when it has a matte finish and feels like a second skin.
Step 6: Peel It Off Gently (The Satisfying Part!)
This is the moment of truth! Get ready for some satisfying (and sometimes slightly painful) removal.
- Start from the Bottom: I find it easiest to start peeling from the bottom edges of the mask, usually from the jawline or chin.
- Slow and Steady: Gently lift an edge and slowly, but firmly, peel the mask upwards towards your forehead. Don’t rip it off quickly – this can irritate your skin.
- Pain Management: If you feel too much pain, or if it’s pulling too many fine hairs, you can use a warm, damp washcloth to gently loosen the mask in that area. It’s better to rinse it off than to damage your skin.
- Inspect the Mask: Once peeled, you might see tiny plugs of gunk and blackheads on the inside of the mask. This is a sign it worked! Gross, but satisfying.
Step 7: Rinse and Tone
After peeling, there might be some small bits of mask residue left on your face.
- Rinse: Gently rinse your face with lukewarm water to remove any remaining mask particles.
- Tone: Follow up with a good toner. Toner helps to close your pores after they’ve been deep-cleaned and balances your skin’s pH level. Apply it with a cotton pad or by gently patting it onto your skin.
Step 8: Moisturize Your Skin
Never skip this step! After a deep cleansing treatment like a black mask, your skin needs hydration.
- Apply Moisturizer: Apply your favorite moisturizer to soothe and hydrate your skin. This helps to lock in moisture and prevent your skin from feeling dry or tight.
- Gentle Massage: Gently massage the moisturizer into your skin until absorbed.
Tips for Best Results and a Happy Face 😊
To make sure you get the most out of your black mask experience and keep your skin happy, here are some extra tips:
- Frequency: Don’t overdo it! Using a black mask once or twice a week is usually sufficient for most skin types. Overuse can strip your skin of its natural oils, leading to dryness or even more oil production.
- Product Quality: Invest in a good-quality black mask. Cheap, unverified products can contain harsh chemicals that might irritate your skin or not work effectively.
- Listen to Your Skin: Everyone’s skin is different. If your skin feels overly sensitive, red, or irritated after using a black mask, reduce the frequency or try a gentler alternative.
- Consistency: Like any skincare routine, consistency is key. Regular use (as advised) will yield better long-term results.
Common Mistakes to Avoid
To ensure a smooth and effective black mask experience, steer clear of these common pitfalls:
- Applying Too Thick/Thin: As mentioned, a layer that’s too thick won’t dry properly, and one that’s too thin will be impossible to peel. Aim for a medium, opaque layer.
- Applying to Wet Skin: Make sure your face is patted dry after cleansing and steaming. The mask won’t adhere properly to wet skin.
- Applying to Sensitive Areas: Seriously, avoid your eyebrows, hairline, and the delicate skin around your eyes and lips. The pulling action can be very painful and damaging to these areas.
- Not Letting It Dry Completely: This is the most common mistake. Rushing the drying time leads to a sticky, frustrating mess rather than a clean peel.
- Over-Exfoliating: Don’t use a black mask right after using other strong exfoliants (like chemical peels or harsh scrubs). This can over-sensitize your skin.
- Ignoring a Patch Test: Skipping the patch test can lead to a full-face allergic reaction. Always test first!
Who Should Use a Black Mask? 🤔
Black masks are particularly beneficial for:
- Oily Skin Types: They excel at soaking up excess sebum.
- Acne-Prone Skin: By clearing pores, they can help prevent breakouts, especially blackheads.
- Those with Blackheads and Clogged Pores: Their primary function is to pull out impurities.
- People living in Polluted Environments: They help remove environmental toxins from the skin.
When to Avoid Black Masks
While wonderful for many, black masks aren’t for everyone. I advise caution or avoidance if you have:
- Very Dry or Sensitive Skin: The peeling action can be too harsh and strip essential moisture.
- Rosacea, Eczema, or Psoriasis: These conditions make your skin more fragile and prone to irritation.
- Active Breakouts or Open Wounds: Applying a peel-off mask to broken skin can worsen inflammation and spread bacteria.
- Facial Hair (for men): If you have a beard or significant stubble, the mask will stick to it and be very painful to remove. For men looking to maintain their facial hair while keeping their skin clear, consider visiting a professional barber or salon. Places like a men’s salon in Karachi or exploring general men’s salon benefits can offer tailored advice and services that don’t involve painful mask removal from facial hair.
Maintaining Your Skin Health Beyond Masks
While black masks are fantastic for deep cleaning, they are just one tool in your skincare arsenal. For truly healthy and glowing skin, a consistent daily routine is essential. This includes regular cleansing, toning, moisturizing, and sun protection.
Beyond at-home care, don’t underestimate the power of professional grooming and skincare services. Visiting a reputable salon, like the best salon in Gulistan-e-Johar or a top salon for grooms, can provide expert advice and treatments tailored to your skin and hair needs. A professional can offer insights into your skin type, recommend suitable products, and even perform facials that go beyond what you can do at home.
For men, understanding the benefits of regular barber visits goes beyond just a haircut. It’s about overall grooming and maintaining a polished look. You can learn more about why visiting a barbershop is more than just a haircut and discover why every man needs a great barber for a holistic approach to your appearance. Taking care of your skin is part of a broader commitment to your overall well-being and confidence.
Final Thoughts
Applying a black mask on your face can be a truly rewarding experience, leaving your skin feeling incredibly clean, smooth, and refreshed. By following this step-by-step guide, you’re not just putting on a mask; you’re engaging in a skincare ritual that can significantly improve your complexion. Remember, preparation, careful application, patience during drying, and gentle removal are the keys to success.
So, go ahead, grab your black mask, and get ready to unmask your glow! With these tips, you’ll be well on your way to clearer, healthier-looking skin that you’ll love to show off. And if you ever feel like treating yourself to professional care, The Barber’s Cafe offers expert facials and skin treatments to keep you looking your best. Happy masking! 💖